
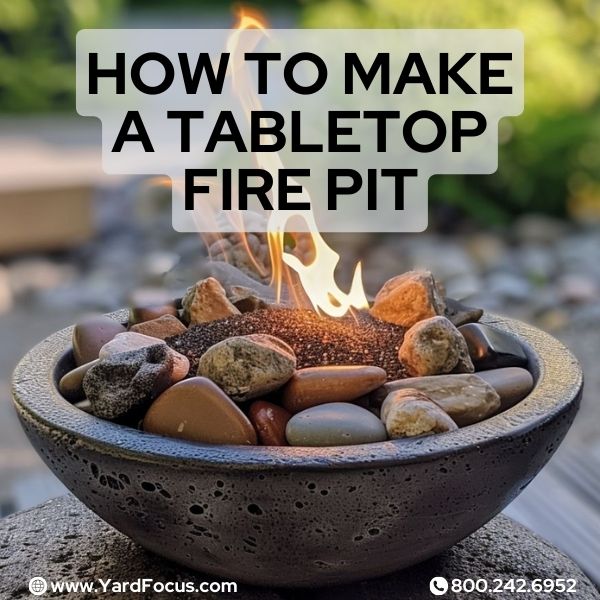
How To Make A Tabletop Fire Pit
Learning how to make a tabletop fire pit will allow you to enjoy the warmth and ambiance of a fire pit, without taking up too much space in your backyard.
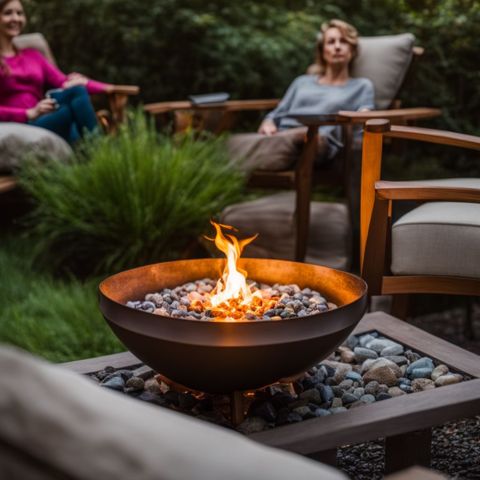
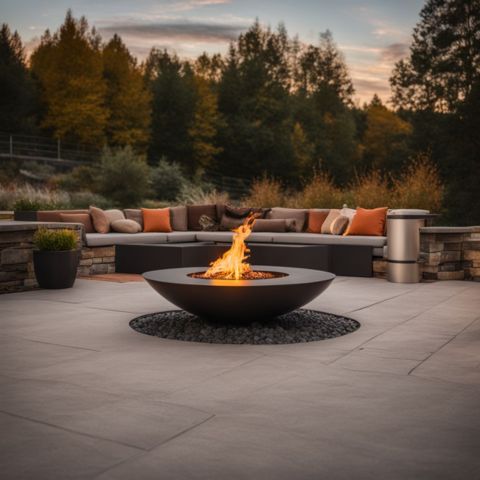
A tabletop fire pit can be a great solution for small outdoor spaces or patios.
In fact, a DIY tabletop fire bowl is a cost-effective alternative to traditional fire pits.
This article will guide you through the steps to create your own tabletop fire pit using simple materials like a planter, sand, rocks, and torch fuel.
You'll be surprised at how easy it is to make and enjoy your own little fire feature in no time!
Supplies Needed for a DIY Tabletop Fire Pit
To make a tabletop fire pit, you will need some essential supplies. Get a planter, sand, rocks, torch fluid, a glass box, metal mesh, gel fuel, and lava rocks.
Planter
Planters are essential for creating a tabletop fire pit. Choose a sturdy, fireproof container large enough to hold the fuel, glass box, and rocks.
Drainage holes prevent water from collecting and damaging the planter.
Metal, ceramic, or stone pots work well as fire pit planters. They come in various shapes and sizes to match your outdoor aesthetic.
Make sure the planter is deep enough to contain the fire safely.
Sand & Rocks
After selecting a suitable planter, the next step is to prepare it with sand and rocks.
Fill the bottom of the planter with a layer of sand about an inch deep. This will provide a stable base for the torch and help absorb any excess fuel.
On top of the sand, place a layer of fire-safe rocks or glass.
These materials will not only add a decorative touch to your tabletop fire pit but also help distribute the heat evenly and prevent the fuel from burning too quickly.
When choosing rocks or glass, ensure they are heat-resistant and won't crack or explode when exposed to high temperatures.
Lava rocks, firebrick, or tempered glass are excellent options for this purpose.
Torch Fluid
After preparing the planter with sand and rocks, you'll need to fill your torch with fluid.
Tiki torch fuel, specifically labeled for use in tabletop fire pits, can be a suitable choice. It's designed to repel insects and produce minimal smoke.
However, always ensure the fuel is intended for the type of fire pit you're using to prioritize safety.
Ethanol or isopropyl alcohol designed for tabletop fire pits can be used, but it's crucial to verify that these fuels are appropriate for your fire pit's design.
Always use fuel as per the manufacturer's recommendations to ensure safety.
Always prioritize safety by selecting fuels recommended by the fire pit manufacturer, and avoid using them for cooking unless they are explicitly food-safe.
Glass Box and Metal Mesh
A glass box and metal mesh are essential components for creating a tabletop fire pit.
The glass box contains the fire and prevents it from spreading. Cut a piece of metal mesh to fit inside the glass box.
The mesh allows oxygen to feed the flames while keeping the burning gel fuel and rocks contained.
Place the metal mesh inside the glass box before adding the small rocks and gel fuel. Light the gel fuel with a long lighter or match.
The flames will flicker and dance, creating a mesmerizing tabletop fire pit.
Gel Fuel
Gel fuel, designed for fire pits, is a clean-burning option that typically contains isopropyl alcohol, water, and a thickening agent.
Ensure the gel fuel is intended for use in tabletop fire pits, as formulations may vary. This mixture creates a gelatinous substance that burns slowly and evenly.
Gel fuel produces a smokeless, low-flame that is safe for indoor and outdoor use.
Gel fuel cans are easy to use in tabletop fire pits. Simply place the can in the center of the fire pit and light it with a long lighter or match.
The can will burn for about 2-3 hours, depending on the size.
Small Rocks
Small rocks or gravel are essential components in creating a tabletop fire pit.
These rocks form a base inside the heat-resistant container, such as a planter or bowl, to hold the fuel for the fire.
The rocks help distribute the heat evenly and protect the container from direct contact with the flames.
Use fire-rated rocks or glass for safety in your DIY tabletop fire pit project.
Place the rocks or gravel in the planter before adding the gel fuel or other flammable material.
Lava rocks are a popular choice for tabletop fire pits because they have a porous surface that helps distribute the flame.
Lava Rocks
Lava rocks are a popular choice for tabletop fire pits. They are made from volcanic rock that has cooled and hardened.
Lava rocks are porous, which allows them to absorb and retain heat.
This makes them ideal for use in fire pits, as they help to distribute the heat evenly and create a more efficient burning process.
When selecting lava rocks for your tabletop fire pit, ensure they are the appropriate size (about 1-2 inches in diameter) and have a porous texture.
Properly sized lava rocks ensure even heat distribution and a stable base for the fire.
Smaller lava rocks, around 1-2 inches in diameter, work best for tabletop fire pits.
They should be placed in a single layer on top of the sand and rocks in the planter.
The lava rocks will help to create a stable base for the fire and prevent the flames from spreading too quickly.
Some tools, like thick leather gloves and a long-handled shovel for moving the lava rocks, are good to have for the project.
The porous nature of lava rocks makes them a great insulation material while also providing an interesting visual texture and color to the tabletop fire pit setup.
Steps to Create a Tabletop Fire Pit
Here are simple steps to make your own tabletop fire pit with supplies from your local hardware store.
Read on to learn how to choose the right planter, prepare it with sand and rocks, assemble the glass box, cut and place the metal mesh, add gel fuel and lava rocks, and safely light up your new fire feature.
Choosing the Right Planter
Choosing the right planter is crucial for a tabletop fire pit. Select a sturdy container made of heat-resistant materials like concrete, ceramic, or terra cotta.
The vessel should be at least 6 inches deep and wide enough to hold the fuel and rocks safely.
Consider using a metal bucket or an old cooking pot for your mini bonfire. Ensure the receptacle has no cracks or holes that could leak fuel.
Pick a low, wide design over a tall, narrow one for better stability and even heat distribution.
Preparing the Planter with Sand & Rocks
After selecting a suitable planter, it's time to prepare it for the fire pit. Pour a layer of sand, about an inch deep, into the bottom of the container.
Sand provides a stable base for the torch and helps with drainage.
On top of the sand, place a layer of small rocks or pebbles. These stones further improve drainage and create a level surface for the torch.
Make sure the rocks are evenly distributed and cover the entire sand layer.
With the planter now ready, you can move on to the next step of assembling your tabletop fire pit.
Fill Your Torch with Fluid
After preparing the planter with sand and rocks, it's time to fill your torch with tiki torch fuel. This special fuel keeps bugs away without creating smoke.
Pour the torch fuel into the wick area of your tiki torch until it's saturated but not overflowing.
You can also use other fuels, like ethanol or alcohol, for ambiance, heat, or roasting marshmallows.
Make sure to follow the manufacturer's instructions and safety precautions when handling any type of combustible liquid.
Assembling the Glass Box
After filling your torch with fluid, it's time to assemble the glass box that will contain your tabletop fire pit. Cut a glass sheet into four pieces, each measuring 8 inches tall.
The length of each piece should be slightly less than the length of each side of your planter.
Use marine silicone to carefully glue the glass pieces together, forming a sturdy and transparent box.
Wear rubber gloves during this process to protect your hands.
Next, cut a piece of metal mesh to fit snugly inside the glass enclosure.
The mesh will sit on the planter's lip and support the fire pit components. This metal grid allows proper ventilation and drainage for your mini bonfire.
Cutting and Placing the Metal Mesh
After assembling the glass box, the next step is to cut and place the metal mesh inside the tabletop fire pit.
The metal mesh serves as a platform to hold the fuel and support the flame.
Cut a piece of mesh that fits snugly inside the fire bowl, ensuring it covers the entire bottom surface.
Securely fasten the mesh in place to prevent it from shifting or collapsing under the weight of the fuel and rocks.
Proper positioning of the metal screen is crucial for the safety and performance of your tabletop campfire.
The mesh allows for adequate airflow and ventilation, which helps maintain a steady and controlled flame.
Adding Small Rocks and Gel Fuel
Place a layer of small rocks or pebbles on top of the metal mesh. Choose rocks that are heat-resistant and non-porous, such as lava rocks or fire glass.
These rocks help distribute the heat evenly and create a visually appealing base for the flames.
Carefully place a gel fuel canister in the center of the fire pit.
Gel fuel is a clean-burning, odorless, and smokeless option for tabletop fire pits. It comes in cans or bottles and can be easily ignited with a long lighter or match.
Make sure to follow the manufacturer's instructions and safety precautions when using gel fuel. Next, we will discuss how to safely light up your tabletop fire pit.
Lighting Up Your Fire Pit
Use long-handled lighters or matches to ignite them from a safe distance. The flames will gradually grow and create a mesmerizing ambiance.
Keep a watchful eye on the fire and ensure proper ventilation.
Always supervise the fire pit while it is in use, keeping children and pets at a safe distance to prevent accidents.
Never leave the fire pit unattended to ensure quick a response to any unexpected issues.
With these precautions, you can enjoy the warmth and glow of your tabletop fire pit.
How to Safely Use a Tabletop Fire Pit
When using a tabletop fire pit, always place it on a stable, non-flammable surface, like a metal or stone table.
Keep the fire pit away from any overhanging branches, awnings, or other flammable materials.
Use a long-handled lighter or match to ignite the fuel canister.
Never leave the fire pit unattended while it's burning. Keep a fire extinguisher or bucket of sand nearby in case of emergencies.
Allow the fire pit to cool completely before handling or storing it.
To ensure a safe and enjoyable experience, only use fuel specifically designed for tabletop fire pits, such as gel fuel or isopropyl alcohol.
Never use gasoline, kerosene, or other highly flammable liquids, as they can cause unpredictable flare-ups and pose severe safety risks.
Follow the manufacturer's instructions for the proper amount and type of fuel to use.
Avoid adding more fuel to a burning fire pit, as this can cause flare-ups or spills.
Extinguish the flames by carefully placing the snuffer cover over the fire pit and allowing it to cool completely before refilling or storing it.
FAQs
What materials do I need to make a tabletop fire pit?
You will need a metal bowl, sand, rocks, and a fuel source like gel fuel or rubbing alcohol to make a tabletop fire pit.
Is it safe to use a tabletop fire pit indoors?
Using a tabletop fire pit indoors is not recommended due to significant risks, including fire hazards and potential carbon monoxide accumulation. Always use fire pits in well-ventilated outdoor areas to ensure safety.
How big should the metal bowl be for a tabletop fire pit?
The metal bowl for a tabletop fire pit should be at least 10 inches wide and 4 inches deep.
Can I use regular sand for my tabletop fire pit?
Yes, you can use regular sand for your tabletop fire pit as long as it is clean and dry.
How long will a tabletop fire pit burn?
The burning time of a tabletop fire pit can significantly vary, from 30 minutes to several hours, depending on factors such as the fuel type, fuel quantity, and fire pit design. Always follow the fuel's guidelines for a more accurate estimate.

Conclusion
Discovering how to make a tabletop fire pit will bring warmth and coziness to your outdoor space.
You can create one with a few supplies from your local home improvement store. Follow the steps carefully and enjoy your new fire feature safely.
With a little creativity, you'll have a beautiful centerpiece for your patio table or backyard gatherings.